ConoHa の VPS にメールサーバーを構築して、DMARC の集計レポートを受け取るように設定を行いましたが、XML ファイルを人力で分析するのは至難の業なのでツールを導入して可視化できるようにしたいと思います。
無料の DMARC 解析ツールは dmarc-visualizer(parsedmarc + Elaticsearch + Grafana)が主流(?)のようですが、今回はシンプルな Open DMARC Analyzer + Open Report Parser の組み合わせで行こうと思います。
環境
- OS: AlmaLinux 9
- サーバー: ConoHa VPS
過去に RHEL9 で構築した記事を検証しながら AlmaLinux 9 で再構築したメールサーバーなので、実質的に下記の記事の続きとなります。
事前準備
Open DMARC Analyzer はデータベースを基に解析ページを作成しますが、メールに添付された XML ファイルの分析・データベースへの登録は Open Report Parser が行います。
DMARC レポートの受信設定
Open Report Parser は指定したメールアカウントの、指定したフォルダーをチェックする仕組みになっていますので、DMARC レポートが届いたら自動的に専用のフォルダーに振り分け設定をしておくと運用が楽になります。
レポートが送られてきたら、Sieve を使って Archive 内の DMARC フォルダーに振り分けるように設定しました。
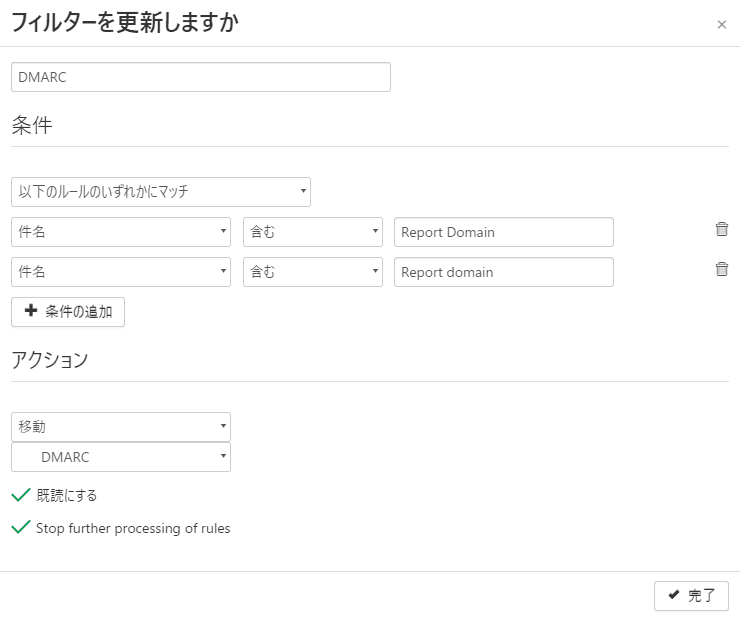
SnappyMail で Sieve のルールの追加する方法は以前の記事を参照してください。
MySQL の設定
Open DMARC Analyzer と Open Report Parser が共通で使用するデータベースを用意しておきます。
phpMyAdmin にログインして「dmarc」ユーザーを作成してください。
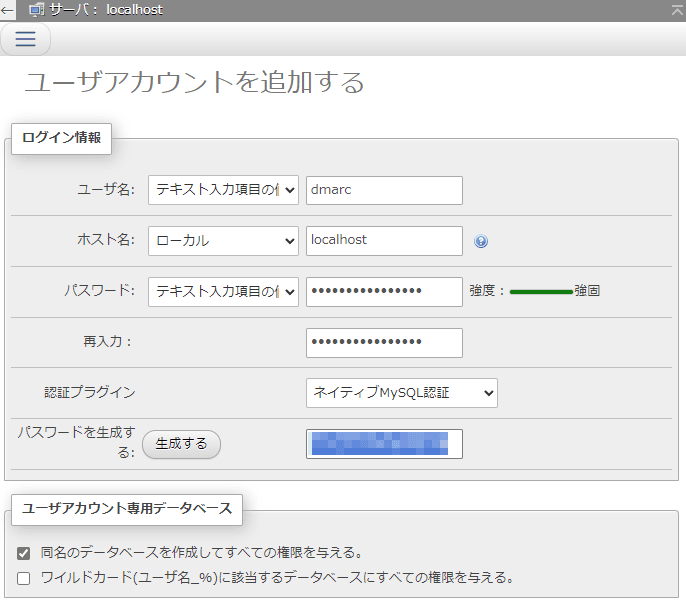
同名のデータベースを作成してすべての権限を与えるようにしました。
1 | CREATE USER 'dmarc'@'localhost' IDENTIFIED VIA mysql_native_password USING '***';GRANT USAGE ON *.* TO 'dmarc'@'localhost' REQUIRE NONE WITH MAX_QUERIES_PER_HOUR 0 MAX_CONNECTIONS_PER_HOUR 0 MAX_UPDATES_PER_HOUR 0 MAX_USER_CONNECTIONS 0;CREATE DATABASE IF NOT EXISTS `dmarc`;GRANT ALL PRIVILEGES ON `dmarc`.* TO 'dmarc'@'localhost'; |
※生成したパスワードは後で使用しますので、控えておいてください。
Open Report Parser のインストール
基本的には公式の CentOS 用の手順に沿って進めれば大丈夫なのですが、Perl モジュールのパッケージで見つからないもの(perl-Mail-Mbox-MessageParser)がありました。
手順の perl-Mail-Mbox-MessageParser 以外をインストールします。
※EPEL リポジトリが必要になりますので、事前に設定しておいてください。(設定方法は以前の記事を参照してください。)
1 | # dnf install perl-File-MimeInfo perl-Mail-IMAPClient perl-MIME-tools perl-XML-Simple perl-DBI perl-Socket6 perl-PerlIO-gzip perl-libwww-perl unzip |
また、依存関係で必要な関連パッケージもインストールしておきます。
1 | # dnf install git lzip perl-JSON perl-LWP-Protocol-https perl-Time-Piece perl-DBD-MySQL |
Perl の Mail::Mbox::MessageParser モジュールの導入
パッケージ管理でインストールしたかったのですが、どのリポジトリにも perl-Mail-Mbox-MessageParser を見つけることができませんでした。
GitHub に開発者のリポジトリがあったので、そこからインストールします。
本来ならリポジトリの説明にある通り make コマンドでインストールするべきなのですが、構築している環境に make コマンドが入っておらず、環境を汚したくなかったのでダウンロードして直接配置しました。
1 2 3 4 5 6 | # wget https://raw.githubusercontent.com/coppit/mail-mbox-messageparser/refs/heads/master/lib/Mail/Mbox/MessageParser.pm -P /usr/share/perl5/Mail/Mbox # wget https://raw.githubusercontent.com/coppit/mail-mbox-messageparser/refs/heads/master/lib/Mail/Mbox/MessageParser/Cache.pm -P /usr/share/perl5/Mail/Mbox/MessageParser # wget https://raw.githubusercontent.com/coppit/mail-mbox-messageparser/refs/heads/master/lib/Mail/Mbox/MessageParser/Grep.pm -P /usr/share/perl5/Mail/Mbox/MessageParser # wget https://raw.githubusercontent.com/coppit/mail-mbox-messageparser/refs/heads/master/lib/Mail/Mbox/MessageParser/MetaInfo.pm -P /usr/share/perl5/Mail/Mbox/MessageParser # wget https://raw.githubusercontent.com/coppit/mail-mbox-messageparser/refs/heads/master/lib/Mail/Mbox/MessageParser/Perl.pm -P /usr/share/perl5/Mail/Mbox/MessageParser # wget https://raw.githubusercontent.com/coppit/mail-mbox-messageparser/refs/heads/master/lib/Mail/Mbox/MessageParser/Config.pm -P /usr/share/perl5/Mail/Mbox/MessageParser |
ダウンロードした Config.pm を修正します。
1 2 3 4 5 6 7 8 9 10 11 12 13 14 | 'programs' => { 'bzip' => '/usr/bin/bzip2', 'bzip2' => '/usr/bin/bzip2', #'cat' => '/usr/local/opt/coreutils/libexec/gnubin/cat', 'cat' => '/usr/bin/cat', 'diff' => '/usr/bin/diff', #'grep' => undef, 'grep' => '/usr/bin/grep', 'gzip' => '/usr/bin/gzip', #'lzip' => '/usr/local/bin/lzip', 'lzip' => '/usr/bin/lzip', #'xz' => '/usr/local/bin/xz', 'xz' => '/usr/bin/xz', }, |
Perl の FileHandle::Unget モジュールの導入
これも perl-FileHandle-Unget のパッケージが見つからなかったので、同様にダウンロードして直接配置しました。
1 | # wget https://raw.githubusercontent.com/coppit/filehandle-unget/refs/heads/master/lib/FileHandle/Unget.pm -P /usr/share/perl5/FileHandle |
Open-Report-Parser のインストール
やっと Open-Report-Parser 本体のインストールになります。
開発者のリポジトリから Git コマンドで /usr/share/Open-Report-Parser にダウンロードして、設定ファイルを report-parser.conf にリネームします。
1 2 3 4 5 | # cd /usr/share/ # git clone https://github.com/userjack6880/Open-Report-Parser.git # cd Open-Report-Parser/ # cp report-parser.conf{.pub,} # vi report-parser.conf |
設定ファイルを編集します。
1 2 3 4 5 6 7 8 9 10 11 12 13 14 15 16 17 18 19 20 21 22 23 24 25 26 27 28 29 30 31 | $debug = 0; $delete_reports = 0; $dmarc_only = 1; # if set to 1, do not process tls reports, if set to -1 do not process # dmarc reports - defaults to 1 for legacy support # this is ignored for all methods except IMAP, use --tls to process # TLS reports for other methods #$dbtype = 'mysql'; # Supported types - mysql, postgres - defaults to mysql if unset $dbname = 'dmarc'; $dbuser = 'dmarc'; $dbpass = 'password'; #$dbhost = 'dbhost'; # Set the hostname if we can't connect to the local socket. $dbport = '3306'; $imapserver = 'localhost'; $imapuser = 'メールアドレス'; $imappass = 'メールパスワード'; $imapport = '143'; $imapssl = '0'; # If set to 1, remember to change server port to 993 and disable imaptls. $imaptls = '0'; $tlsverify = '0'; $imapignoreerror = '0'; # recommended if you use MS Exchange 2007, ... #$imapauth = 'simple'; # supported - simple, oauth2 - defaults to simple if unset # see documentation for detailed setup #$oauthclientid = ''; #$oauthuri = ''; $imapdmarcfolder = 'Dbox.Archive.DMARC'; #$imaptlsfolder = 'Dbox.Archive.TLS-RPT'; |
私の環境では Single-dbox 形式の Archive フォルダー内に DMARC フォルダーを配置しているので、$imapdmarcfolder の指定が Dbox.Archive.DMARC となっていますが、Maildir 形式の場合は INBOX.DMARC とかになると思います。
動作確認
オプションを付けずに実行して、エラーが出ないか確認します。
1 2 3 4 5 6 7 8 9 10 11 12 13 14 15 16 17 18 19 20 21 22 23 24 25 26 27 | # ./report-parser.pl Usage: ./report-parser.pl [OPTIONS] [PATH] This script needs a configuration file called <report-parser.conf> in the current working directory, which defines a database server with credentials and (if used) an IMAP server with credentials. Additionaly, one of the following source options must be provided: -i : Read reports from messages on IMAP server as defined in the config file. -m : Read reports from mbox file(s) provided in PATH. -e : Read reports from MIME email file(s) provided in PATH. -x : Read reports from xml file(s) provided in PATH. -j : Read reports from json files(s) provided in PATH. -z : Read reports from zip file(s) provided in PATH. The following optional options are allowed: -d : Print debug info. -r : Replace existing reports rather than skipping them. --delete : Delete processed message files (the XML is stored in the database for later reference). --info : Print out number of XML files or emails processed. --tls : Force TLS-Only Mode. Open Report Parser: Please provide a source option (-i, -x, -m, -e or -z). |
初回取り込み
問題なさそうなので、-i オプションで設定ファイルを反映させて実行します。
1 | # ./report-parser.pl -i |
エラーメッセージが出なければうまく動作しているはずです。phpMyAdmin を使って dmarc データベースの report テーブルに取り込んだデータが格納されていることを確認しましょう。
実行時に Use of uninitialized value in concatenation (.) or string at ./report-parser.pl line 447. のエラーが出る場合は、$imapdmarcfolder の指定が正しくない可能性が高いです。
パスの指定が .(ドット)で始まったり、パスの区切りが /(スラッシュ)だとエラーになります。-d オプションを付けてエラーメッセージを確認しましょう。
データベースに取り込んだメールは不要なので、削除するように設定ファイルを変更します。
1 2 3 | $delete_reports = 0; ↓ $delete_reports = 1; |
定期実行
cron に登録して定期的に実行するようにします。
Perl のライブラリパスを指定しないと動かないので注意してください。
1 2 | PERL5LIB=/usr/share/Open-Report-Parser:/usr/share/Open-Report-Parser/lib 0 5 * * * root /usr/share/Open-Report-Parser/report-parser.pl -i --info >> /var/log/open-report-parser.log 2>&1 |
以上で、Open-Report-Parser で DMARC レポートをデータベースに取り込むところまではできました。
Open DMARC Analyzer をインストール
続いて、データベースに取り込んだ DMARC レポートを表示するための Open DMARC Analyzer を入れて行きます。
開発者のリポジトリから Git コマンドで /usr/share/Open-DMARC-Analyzer にダウンロードします。
1 2 3 | # cd /usr/share/ # git clone https://github.com/userjack6880/Open-DMARC-Analyzer.git # cd Open-DMARC-Analyzer/ |
kevinoo/phpWhois のインストール
Open DMARC Analyzer を動かすには、先ほどインストールした Open-Report-Parser に加えて「kevinoo/phpWhois」または「MaxMind DB Reader PHP API」のどちらかが必須になるようです。
MaxMind DB は面倒そうだったので、今回はお手軽な phpWhois をチョイスしました。
Composer を使ってインストールするので root ではなく、ユーザーとして実行していきます。
1 2 | $ sudo chown ユーザー:グループ -R /usr/share/Open-DMARC-Analyzer/ $ cd /usr/share/Open-DMARC-Analyzer/ |
Composer が入っていない場合は、ローカルインストールしていきます。既に入っている場合は次のステップまで進んでください。
1 2 3 4 5 6 7 8 9 10 11 12 | $ mkdir bin $ php -r "copy('https://getcomposer.org/installer', 'composer-setup.php');" $ php -r "if (hash_file('sha384', 'composer-setup.php') === 'dac665fdc30fdd8ec78b38b9800061b4150413ff2e3b6f88543c636f7cd84f6db9189d43a81e5503cda447da73c7e5b6') { echo 'Installer verified'; } else { echo 'Installer corrupt'; unlink('composer-setup.php'); } echo PHP_EOL;" Installer verified $ php composer-setup.php --install-dir=bin --filename=composer All settings correct for using Composer Downloading... Composer (version 2.8.4) successfully installed to: /usr/share/Open-DMARC-Analyzer/bin/composer Use it: php bin/composer $ php -r "unlink('composer-setup.php');" |
Composer を使って kevinoo/phpWhois をインストールしていきます。
1 2 3 4 5 6 7 8 9 10 11 12 13 14 15 16 17 18 19 20 21 22 | $ composer require "kevinoo/phpwhois":"^6.3" ./composer.json has been created Running composer update kevinoo/phpwhois Loading composer repositories with package information Updating dependencies Lock file operations: 3 installs, 0 updates, 0 removals - Locking algo26-matthias/idna-convert (v3.1.1) - Locking jakeasmith/http_build_url (1.0.1) - Locking kevinoo/phpwhois (v6.3.4) Writing lock file Installing dependencies from lock file (including require-dev) Package operations: 3 installs, 0 updates, 0 removals - Downloading jakeasmith/http_build_url (1.0.1) - Downloading algo26-matthias/idna-convert (v3.1.1) - Downloading kevinoo/phpwhois (v6.3.4) - Installing jakeasmith/http_build_url (1.0.1): Extracting archive - Installing algo26-matthias/idna-convert (v3.1.1): Extracting archive - Installing kevinoo/phpwhois (v6.3.4): Extracting archive Generating autoload files No security vulnerability advisories found. $ sudo chown nobody. -R /usr/share/Open-DMARC-Analyzer/ |
※OpenLiteSpeed なので所有者を nobody に変更していますが、Apache などの場合は適宜変更してください。
Open DMARC Analyzer の設定
再び root ユーザーで説明していきます。
1 2 3 | # cd /usr/share/Open-DMARC-Analyzer/ # cp config.php{.pub,} # vi config.php |
データベースのパスワードと、GeoIP2 の設定を変更します。また、好みに応じてページ当たりに表示する期間を調整します。
1 2 3 4 5 6 7 8 9 10 11 12 13 14 15 16 17 18 19 20 21 22 23 24 25 26 27 | // Database Settings define('DB_HOST', 'localhost'); define('DB_USER', 'dmarc'); define('DB_PASS', 'password'); define('DB_NAME', 'dmarc'); define('DB_PORT', '3306'); // default port 3306, 5432 for pgsql define('DB_TYPE', 'mysql'); // supported mysql and pgsql // Debug Settings define('DEBUG', 1); // Template Settings define('TEMPLATE', 'openda'); // Package Loader define('AUTO_LOADER', 'vendor/autoload.php'); // autoloader for composer installed libraries // GeoIP2 Settings define('GEO_ENABLE', 0); // 0 - disable GeoIP2, 1 - enable GeoIP2 define('GEO_DB', 'includes/geolite2.mmdb'); // location of GeoIP2 database // Date Range define('DATE_RANGE', '-1m'); |
ウェブサーバーの設定変更
OpenLiteSpeed の管理画面から「バーチャルホスト」>(ドメイン名)>「コンテキスト」と辿り、Open DMARC Analyzer を外部から閲覧できるように設定します。
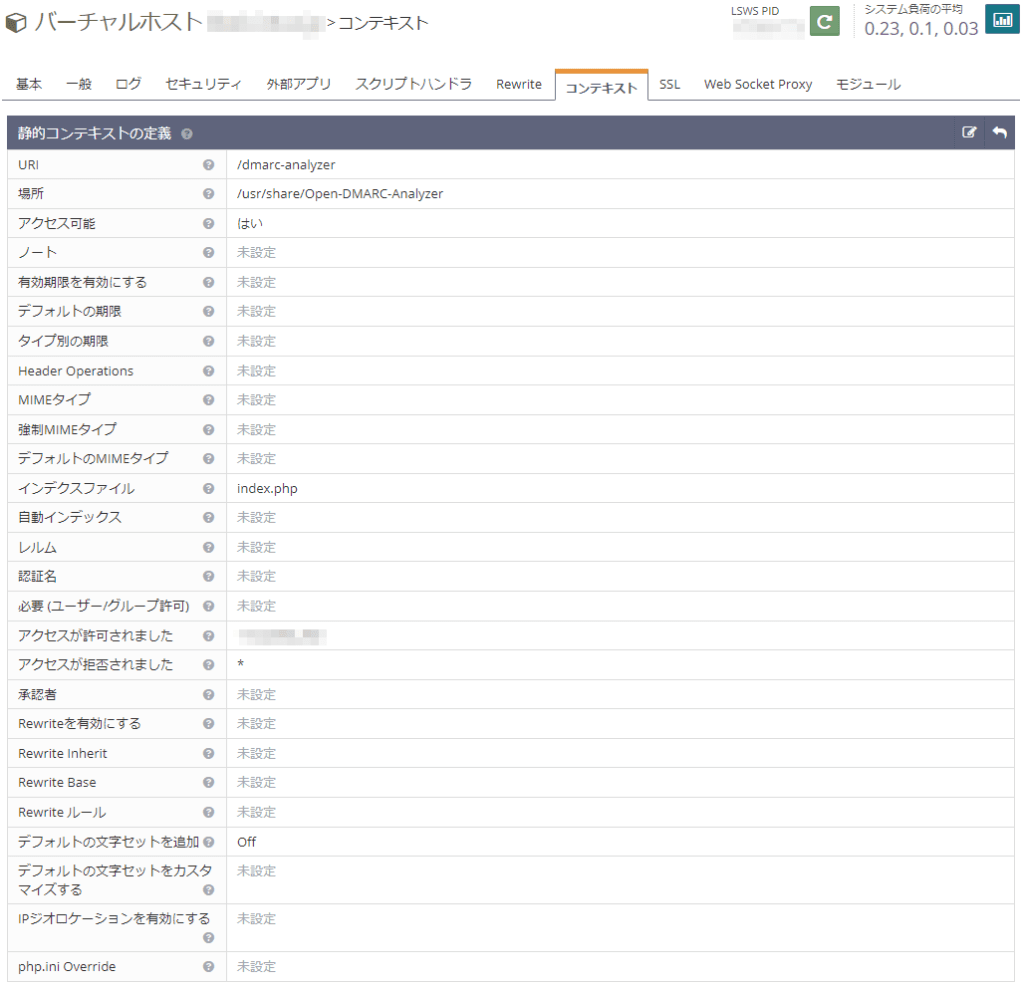
ついでに管理者の IP アドレスからしかアクセスできないように設定しました。
Apache での設定は、こんな感じになると思います。
1 2 3 4 5 6 | Alias /dmarc-analyzer /usr/share/Open-DMARC-Analyzer <Directory /usr/share/Open-DMARC-Analyzer/> Require local Require ip xxx.xxx.xxx.xxx </Directory> |
セットアップスクリプトを実行
https://(ドメイン名)/dmarc-analyzer/install.php にブラウザからアクセスすると、初回セットアップ用のスクリプトが走り、dmarc データベースに report_stats という名前のビューが作成されます。
1 2 3 4 5 6 7 8 9 10 11 12 13 14 15 16 | connecting to database... success opening file... success → CREATE VIEW IF NOT EXISTS report_stats AS ( → SELECT → report.serial, domain, rcount, disposition, reason, → policy_p, policy_pct, dkimdomain, dkimresult, dkim_align, → spfdomain, spfresult, spf_align, mindate, maxdate → FROM report RIGHT JOIN rptrecord → ON report.serial=rptrecord.serial → ); performing query... success database successfully updated deleting installation files DELETED → mysql.sql DELETED → pgsql.sql DELETED → install.php |
パーミッションエラーで削除できなかった場合は、手動で削除してください。
1 2 3 | # rm /usr/share/Open-DMARC-Analyzer/install.php # rm /usr/share/Open-DMARC-Analyzer/mysql.sql # rm /usr/share/Open-DMARC-Analyzer/pgsql.sql |
動作確認
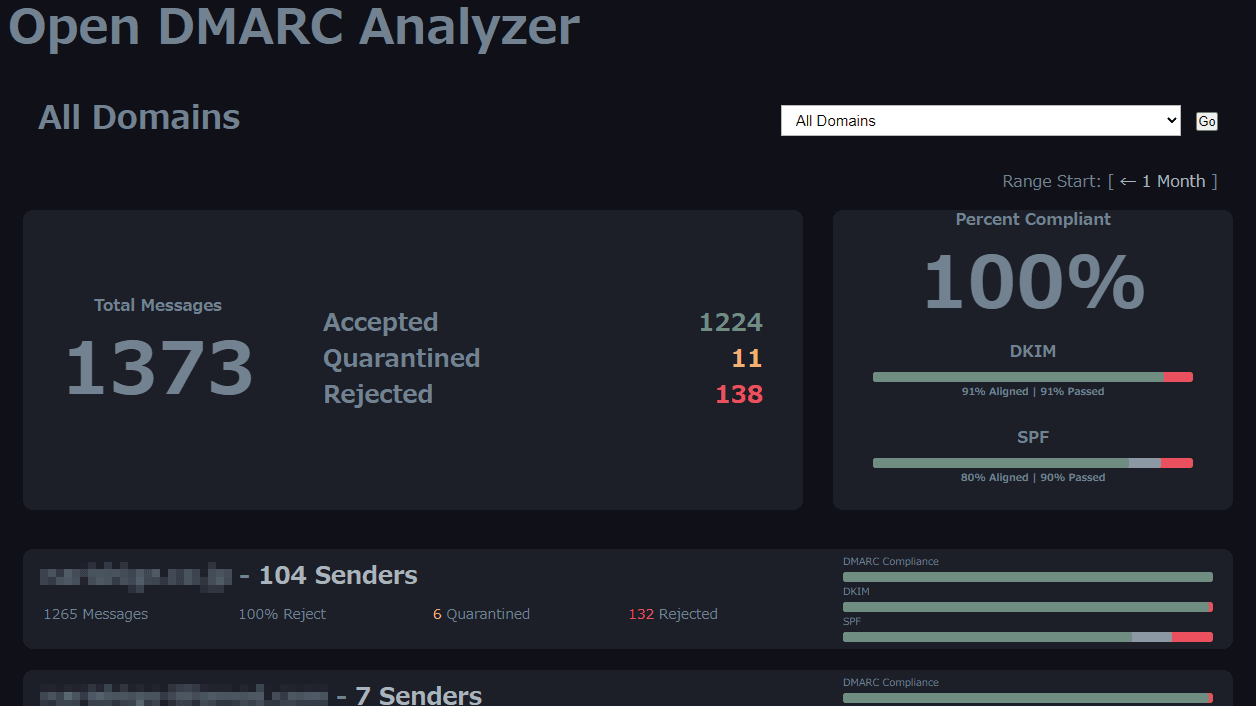
改めて https://(ドメイン名)/dmarc-analyzer/ にアクセスすると、Open DMARC Analyzer のページが正しく表示されました。
件数が多いと、Domain Summary を開くのにすごく時間がかかります。大規模なサーバーの場合は DATE_RANGE の設定を -1m(1ヶ月)ではなく -1w(1週間)にした方が良いかもしれません。
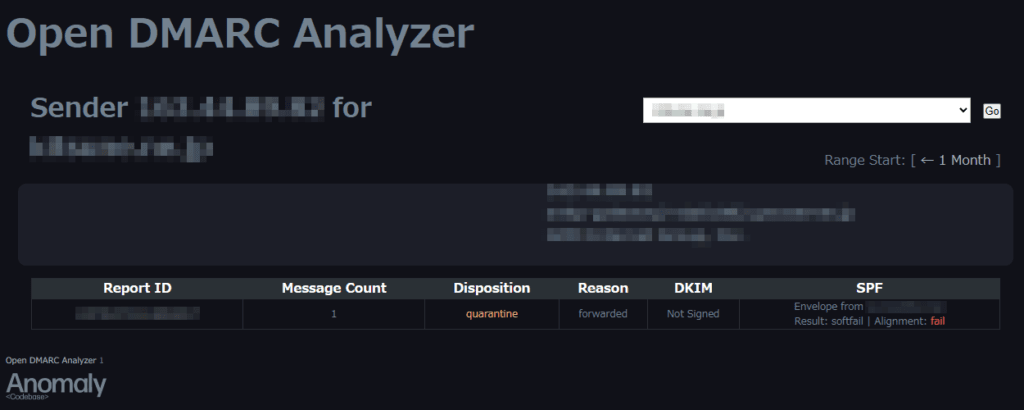
Sender IP アドレスをクリックしても詳細レポートが表示されない場合は、GeoIP2 が有効になっているか phpWhois が正しくセットアップされていない可能性があります。
まとめ
思ったより導入が大変でしたが、きちんと DMARK レポートの分析ができるようになったので良かったです。一度設定しておけば運用自体には手間がかからないのも良いですね。


コメント