ここまで、ConoHa の VPS 上に RHEL9 をインストールし、そこに OpenLiteSpeed によるウェブサーバーなどを構築してきました。
今回はそこにメールサーバーを構築していこうと思います。
方針としては、お決まりの Postfix +Dovecot を使い、ユーザー認証は MySQL と連動させようと思います。
事前準備
ファイアウォールの設定
まず、サーバーがメールを受信できるように 25 番ポートを開放する必要があります。
また、メールクライアントから接続する SMTPS(465 番ポート)と IMAPS(993 番ポート)は国内からしか接続しない想定で、国内のみに向けて開放するようにします。
POP 接続はしない方針なので、POPS(995 番ポート)は塞いでおきます。
また、SSL 接続しか許可しない方針なので POP(110 番ポート)、IMAP(143 番ポート)も塞いでおきます。
Sieve の設定は同じサーバーに設置した SnappyMail から行うので、ManageSieve(4190 番ポート)は塞いでおきます。MUA(Thunderbird など)から設定を行う場合は、国内のみに向けて開放してください。
詳しい設定方法は以前の記事をご参照ください。
ついでに、Fail2ban の postfix-sasl と dovecot を有効にしておくと、連続して不正なアクセスがあった場合に自動でブロックしてくれます。
1 2 3 4 5 | [postfix-sasl] enabled = true [dovecot] enabled = true |
/etc/fail2ban/jail.local の最終行に上記 2 項目を追加して、サービスを再起動しておきます。
1 | # systemctl restart fail2ban |
メールユーザーを作成する
メール用のユーザーとグループを ID 番号を指定して作成します。
1 2 | # groupadd -g 10000 vmail # useradd -g 10000 -u 10000 -s /sbin/nologin vmail |
※UID は設定ファイルに記述しますので、わかりやすくするために 10000 としました。
データベースを作成
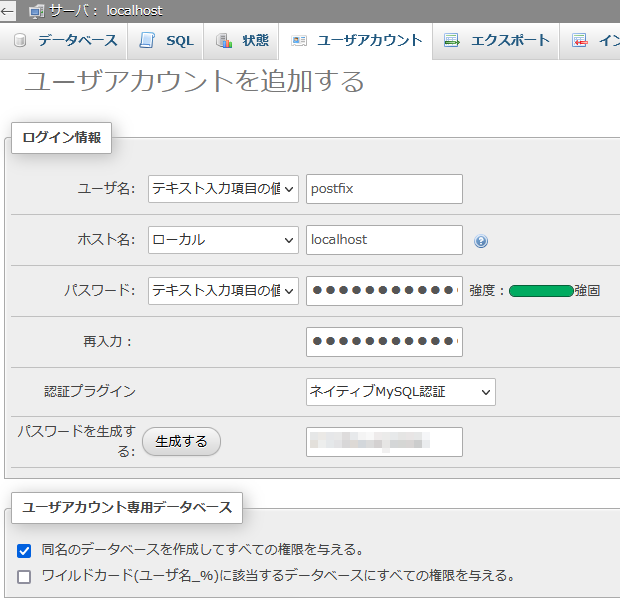
メールのユーザーをデータベースで管理するので、phpMyAdmin から postfix ユーザーを作成し、同名のデータベースにすべての権限を与えます。
PostfixAdmin
PostfixAdmin 現時点での最新版である Version 3.3.13 をダウンロードします。
1 2 3 4 5 6 | # wget https://github.com/postfixadmin/postfixadmin/archive/refs/tags/postfixadmin-3.3.13.zip # unzip postfixadmin-3.3.13.zip # mv postfixadmin-postfixadmin-3.3.13 /usr/share/postfixAdmin # mkdir /usr/share/postfixAdmin/templates_c # chown nobody. /usr/share/postfixAdmin/ -R # rm -f postfixadmin-3.3.13.zip |
OpenLiteSpeed に合わせて PostfixAdmin の所有者(グループ)を nobody にしていますが、Apache や Nginx の場合は適宜合わせてください。
PHP 関連パッケージのインストール
PostfixAdmin で使用する php-imap をインストールします。
1 2 3 4 5 6 7 8 9 10 11 12 13 14 15 16 | # dnf install lsphp82-imap サブスクリプション管理リポジトリーを更新しています。 依存関係が解決しました。 ============================================================================================================================================================================================================================================================================================================================= パッケージ アーキテクチャー バージョン リポジトリー サイズ ============================================================================================================================================================================================================================================================================================================================= インストール: lsphp82-imap x86_64 8.2.11-2.el9 litespeed-update 43 k トランザクションの概要 ============================================================================================================================================================================================================================================================================================================================= インストール 1 パッケージ ダウンロードサイズの合計: 43 k インストール後のサイズ: 113 k これでよろしいですか? [y/N]: y |
※OpenLiteSpeed 用の PHP8.2 に対応した lsphp82-imap をインストールしました。
各種スクリプトの設置
PostfixAdmin を解凍すると、ADDITIONS ディレクトリにサンプルスクリプトが入っています。
メールアドレス削除時の処理と、ドメイン削除時の処理をユーザーディレクトリにコピーします。
1 2 3 4 5 6 7 | # mkdir /home/vmail/bin # cp /usr/share/postfixAdmin/ADDITIONS/postfixadmin-mailbox-postdeletion.sh /home/vmail/bin/ # cp /usr/share/postfixAdmin/ADDITIONS/postfixadmin-domain-postdeletion.sh /home/vmail/bin/ # chown vmail:nobody -R /home/vmail/bin/ # chmod 700 /home/vmail/bin/*.sh # mkdir /home/vmail/.deleted-maildirs # chown vmail. /home/vmail/.deleted-maildirs/ |
メールアドレス作成時のディレクトリの作成は Dovecot に任せますので、postfixadmin-mailbox-postcreation.sh は設定不要です。
メールアドレス削除時に走るスクリプトの編集
PostfixAdmin からメールアドレスを削除する際のスクリプトを編集します。
1 2 3 4 5 6 7 8 9 10 11 12 13 | # Change this to where you keep your virtual mail users' maildirs. #basedir=/var/spool/maildirs basedir=/home/vmail # Change this to where you would like deleted maildirs to reside. #trashbase=/var/spool/deleted-maildirs trashbase=/home/vmail/.deleted-maildirs if [ ! -e "$maildir" ]; then echo "maildir '$maildir' does not exist; nothing to do." #exit 1 exit 0 fi |
ドメイン削除時に走るスクリプトの編集
PostfixAdmin からドメインを削除する際のスクリプトを編集します。
1 2 3 4 5 6 7 | # Change this to where you keep your virtual mail users' maildirs. #basedir=/var/spool/maildirs basedir=/home/vmail # Change this to where you would like deleted maildirs to reside. #trashbase=/var/spool/deleted-maildirs trashbase=/home/vmail/.deleted-maildirs |
スクリプトの実行権限を調整
スクリプトを実行させるときのユーザーを sudo の例外に追加します。
1 | # visudo |
スクリプトに対してパスワードなしで sudo できるように設定を追加します。
1 2 3 4 | ## Same thing without a password # %wheel ALL=(ALL) NOPASSWD: ALL nobody ALL=(vmail) NOPASSWD: /home/vmail/bin/postfixadmin-mailbox-postdeletion.sh nobody ALL=(vmail) NOPASSWD: /home/vmail/bin/postfixadmin-domain-postdeletion.sh |
※OpenLiteSpeed から実行するので nobody になっています。Apache やNginx の場合は適宜ユーザーを合わせてください。
※PostfixAdmin からメールアドレス削除やドメイン削除を行った時の処理は、メールアドレス(ドメイン)のディレクトリを .deleted-maildirs に移動するだけなので、ディスク容量を空けるためには手動で削除する必要があります。
OpenLiteSpeed の設定
OLS の管理画面から「バーチャルホスト」⇒ ホスト名 ⇒「コンテキスト」と辿り、静的コンテキストを追加します。
- タイプ:Static
- URI:/postfixadmin
- 場所:/usr/share/postfixAdmin/public
ロケーションには PostfixAdmin のディレクトリ配下の public を指定します。
PostfixAdmin の設定ファイルを作成
PostfixAdmin の設定ファイル(config.inc.php)は編集せず、同じ階層の config.local.php で設定していきます。
1 2 3 4 5 6 7 8 9 10 11 12 13 14 15 16 17 18 | <?php $CONF['configured'] = true; $CONF['setup_password'] = ''; $CONF['default_language'] = 'ja'; $CONF['database_type'] = 'mysqli'; $CONF['database_host'] = 'localhost'; $CONF['database_user'] = 'postfix'; $CONF['database_password'] = 'XXXXXXXXXXXX'; $CONF['database_name'] = 'postfix'; $CONF['database_prefix'] = ''; $CONF['footer_text'] = 'ドメイン名'; $CONF['footer_link'] = 'https://ドメイン名'; # パスワードのバリデーションを無効にする場合 #$CONF['password_validation'] = array(); $CONF['mailbox_postdeletion_script'] = 'sudo -u vmail /home/vmail/bin/postfixadmin-mailbox-postdeletion.sh'; $CONF['domain_postdeletion_script'] = 'sudo -u vmail /home/vmail/bin/postfixadmin-domain-postdeletion.sh'; ?> |
セットアップパスワードの取得
PostfixAdmin のセットアップ画面(https://ドメイン名/postfixadmin/setup.php)にアクセスして、Generate setup_password hash を行います。

ここで生成した setup_password を設定ファイル(config.local.php)に貼り付けます。
PostfixAdmin のセットアップ画面にログインして、エラーがなければ完了です。
※Postfix データベースの中のテーブルもこのタイミングで作成されます。
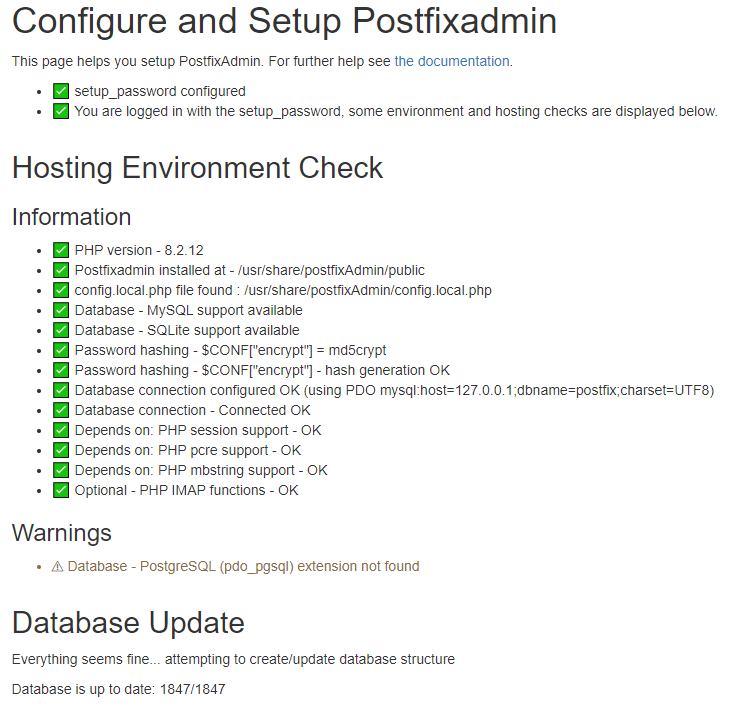
セットアップユーザーが完了したら、管理ユーザーとパスワードを登録しておきましょう。
Postfix のインストール
1 2 3 4 5 6 7 8 9 10 11 12 13 14 15 16 | # dnf install postfix postfix-mysql 依存関係が解決しました。 ============================================================================================================================================================ パッケージ アーキテクチャー バージョン リポジトリー サイズ ============================================================================================================================================================ インストール: postfix x86_64 2:3.5.9-24.el9 rhel-9-for-x86_64-appstream-rpms 1.5 M postfix-mysql x86_64 2:3.5.9-24.el9 rhel-9-for-x86_64-appstream-rpms 27 k トランザクションの概要 ============================================================================================================================================================ インストール 2 パッケージ ダウンロードサイズの合計: 1.5 M インストール後のサイズ: 4.4 M これでよろしいですか? [y/N]: y |
Postfix の基本設定
1 2 3 4 5 6 7 8 9 10 11 12 13 14 15 16 17 18 19 20 21 22 23 24 | #myhostname = virtual.domain.tld ↓ myhostname = mail.ドメイン名 #mydomain = domain.tld ↓ mydomain = ドメイン名 #myorigin = $mydomain ↓ myorigin = $mydomain inet_interfaces = localhost ↓ inet_interfaces = all #home_mailbox = Maildir/ ↓ home_mailbox = Maildir/ #smtpd_banner = $myhostname ESMTP $mail_name ($mail_version) ↓ smtpd_banner = $myhostname ESMTP unknown |
home_mailbox(メールボックス形式)を Maildir 形式にするところがポイントです。
認証の設定
SASL(Simple Authentication and Security Layer)を設定して、メールの認証は Dovecot に任せます。
1 2 3 4 5 6 7 8 9 10 11 12 13 14 | # SASL smtpd_sasl_type = dovecot smtpd_sasl_path = private/auth smtpd_sasl_security_options = noanonymous smtpd_sasl_local_domain = $myhostname # 2024/02/06 以下訂正 # # smtpd_sasl_auth_enable = yes # ↑ 25 番ポートで認証してしまうためここに記述するのは間違い # master.cf の smtps(465)や submission(587)に記述する # # broken_sasl_auth_clients = yes # ↑ Outlook Express 4 や Microsoft Exchange 5 向けで、もはや不要な設定 |
Virtual Mail Box の設定
ユーザー認証に MySQL(MariaDB)を使用するので、データベース接続用の各種クエリを作成します。
1 2 3 4 5 6 7 8 | user = postfix password = XXXXXXXXXXXX hosts = localhost dbname = postfix table = mailbox select_field = maildir where_field = username additional_conditions = and active = '1' |
1 2 3 4 5 6 7 8 | user = postfix password = XXXXXXXXXXXX hosts = localhost dbname = postfix table = domain select_field = domain where_field = domain additional_conditions = and active = '1' |
1 2 3 4 5 6 7 8 | user = postfix password = XXXXXXXXXXXX hosts = localhost dbname = postfix table = alias select_field = goto where_field = address additional_conditions = and active = '1' |
Postfix の main.conf の最終行にバーチャルメールボックスについての設定を入れていきます。
また、メールのローカル配送は Dovecot に任せるため、virtual_transport には Dovecot を指定します。
1 2 3 4 5 6 7 8 9 10 11 12 | # Virtual Mail Box local_transport = local virtual_transport = dovecot virtual_uid_maps = static:10000 virtual_gid_maps = static:10000 virtual_minimum_uid = 10000 virtual_mailbox_base = /home/vmail virtual_mailbox_maps = mysql:/etc/postfix/mysql_virtual_mailbox_maps.cf virtual_mailbox_domains = mysql:/etc/postfix/mysql_virtual_domains_maps.cf virtual_alias_maps = mysql:/etc/postfix/mysql_virtual_alias_maps.cf virtual_alias_domains = $virtual_alias_maps dovecot_destination_recipient_limit = 1 |
Postfix の master.cf の最終行に、ローカル配送を Dovecot に送る設定を追加します。
1 2 3 | # Dovecot LDA dovecot unix - n n - - pipe flags=DRhu user=vmail:vmail argv=/usr/libexec/dovecot/dovecot-lda -f ${sender} -d ${recipient} |
Postfix のセキュリティ設定
Postfix のセキュリティに関する設定を追加します。
main.cf の最終行に下記を追加してください。
1 2 3 4 5 6 7 8 9 10 11 12 13 14 15 16 17 18 19 20 21 22 23 24 25 26 27 28 29 30 31 32 33 34 35 36 37 38 39 40 41 | # 内部ユーザの隠蔽 disable_vrfy_command = yes # HELO/EHLO コマンドの要求 smtpd_helo_required = yes # HELO/EHLO コマンド時の制限設定 smtpd_helo_restrictions = # $mynetworks 内からの接続は許可 permit_mynetworks # EHLO ホスト名の文法が不正な場合に要求を拒否 reject_invalid_hostname # EHLO ホスト名の文法が RFC で要求されているような完全修飾ドメイン形式ではない場合に要求を拒否 reject_non_fqdn_hostname # MAIL FROM コマンド時の制限設定 smtpd_sender_restrictions = # 送信者ドメインが存在しない(DNSに「A」や「MX」レコードが無い)場合に要求を拒否 reject_unknown_sender_domain # 送信者ドメインが RFC で要求されているような完全修飾ドメイン形式ではない場合に要求を拒否 reject_non_fqdn_sender # RCPT TO コマンド時の制限設定 smtpd_recipient_restrictions = # アクセスしてきているクライアントのIPアドレスが$mynetworksにマッチする場合許可 permit_mynetworks # SASL 認証に成功した場合のメール送信を許可 permit_sasl_authenticated # このサーバで配送終了とならないドメイン宛メール送信要求を拒否(不正中継対応) reject_unauth_destination # このサーバで配送終了となるドメイン宛メール送信を許可 permit_auth_destination # メールリレーの設定 smtpd_relay_restrictions = # $mynetworks に記載されたクライアントからのメールリレーを許可 permit_mynetworks # SASL 認証されたメールのリレーを許可 permit_sasl_authenticated # 不明な宛先からのメールリレーを一時的なエラーコード(4xx)で拒否 defer_unauth_destination |
Postfix の起動
ここまでできたら、Postfix を起動します。
1 2 3 | # systemctl start postfix # systemctl enable postfix Created symlink /etc/systemd/system/multi-user.target.wants/postfix.service → /usr/lib/systemd/system/postfix.service. |
Dovecot のインストール
Dovecot をインストールしていきます。MySQL でユーザー認証するため dovecot-mysql を、Sieve でメール振り分けをするので dovecot-pigeonhole もあわせてインストールします。
1 2 3 4 5 6 7 8 9 10 11 12 13 14 15 16 17 18 19 20 21 | # dnf install dovecot dovecot-mysql dovecot-pigeonhole 依存関係が解決しました。 ============================================================================================================================================================= パッケージ アーキテクチャー バージョン リポジトリー サイズ ============================================================================================================================================================= インストール: dovecot x86_64 1:2.3.16-10.el9 rhel-9-for-x86_64-appstream-rpms 4.9 M dovecot-mysql x86_64 1:2.3.16-10.el9 rhel-9-for-x86_64-appstream-rpms 21 k dovecot-pigeonhole x86_64 1:2.3.16-10.el9 rhel-9-for-x86_64-appstream-rpms 390 k 依存関係のインストール: clucene-core x86_64 2.3.3.4-42.20130812.e8e3d20git.el9 rhel-9-for-x86_64-appstream-rpms 590 k libexttextcat x86_64 3.4.5-11.el9 rhel-9-for-x86_64-appstream-rpms 249 k libstemmer x86_64 0-18.585svn.el9 rhel-9-for-x86_64-appstream-rpms 85 k トランザクションの概要 ============================================================================================================================================================= インストール 6 パッケージ ダウンロードサイズの合計: 6.2 M インストール後のサイズ: 22 M これでよろしいですか? [y/N]: y |
Dovecot の設定ファイルは、dovecot.conf と同じディレクトリに local.conf を新規作成して、全てそちらに記述するようにします。
1 | # touch /etc/dovecot/local.conf |
1 2 3 4 5 6 7 8 9 10 11 12 13 14 15 16 17 18 19 20 21 22 23 24 25 26 27 28 29 30 31 32 33 34 35 36 37 38 39 40 41 42 43 44 45 46 47 48 49 50 51 52 53 54 55 56 57 58 59 60 61 62 63 64 65 66 67 68 69 70 71 72 73 74 75 76 77 78 79 80 81 82 83 84 85 | # デバッグ関係 #auth_verbose = yes #auth_debug = yes #mail_debug = yes #auth_debug_passwords = yes listen = * log_path = syslog maildir_stat_dirs = yes disable_plaintext_auth = no auth_mechanisms = cram-md5 plain login # @以降なし mail_location = maildir:/home/vmail/%d/%n # @以降あり #mail_location = maildir:/home/vmail/%d/%u first_valid_uid = 10000 protocols = imap lmtp sieve protocol imap { mail_plugins = $mail_plugins } protocol lmtp { mail_plugins = $mail_plugins } protocol lda { mail_plugins = $mail_plugins } passdb { driver = sql args = /etc/dovecot/dovecot-sql.conf.ext } userdb { driver = sql args = /etc/dovecot/dovecot-sql.conf.ext } service auth { unix_listener /var/spool/postfix/private/auth { mode = 0666 user = vmail } } service stats { unix_listener stats-reader { user = vmail group = vmail mode = 0660 } unix_listener stats-writer { user = vmail group = vmail mode = 0660 } } # 初回ログイン時にディレクトリを自動作成 namespace inbox { inbox = yes location = maildir:~/maildir mailbox Drafts { auto = subscribe } mailbox Junk { auto = subscribe } mailbox Trash { auto = subscribe } mailbox Sent { auto = subscribe } } # Archive フォルダのみ sdbox 形式 namespace archive { location = sdbox:~/ separator = . prefix = Dbox. mailbox Archive { auto = subscribe } } |
Archive フォルダーにはパフォーマンスが高いといわれている Single-dbox(sdbox)形式を使ってみます。そのため、Maildir 形式の場合は maildir に纏めるように location を変更しました。
10-auth.conf を編集して、使用しない設定を読み込まないようにします。
1 2 3 4 5 6 7 | auth_mechanisms = plain ↓(コメントアウトする) #auth_mechanisms = plain !include auth-system.conf.ext ↓(コメントアウトする) #!include auth-system.conf.ext |
Dovecot の SQL 接続設定ファイル(dovecot-sql.conf.ext)を作成します。
1 2 | # touch /etc/dovecot/dovecot-sql.conf.ext # chmod 700 /etc/dovecot/dovecot-sql.conf.ext |
1 2 3 4 5 6 | driver = mysql connect = host=/var/lib/mysql/mysql.sock dbname=postfix user=postfix password=XXXXXXXXXXXX default_pass_scheme = MD5-CRYPT password_query = SELECT username AS user, password FROM mailbox WHERE username = '%u' AND active = '1' user_query = SELECT concat('/home/vmail/', maildir) AS home, 10000 AS uid, 10000 AS gid FROM mailbox WHERE username = '%u' AND active = '1' iterate_query = SELECT username as user FROM mailbox WHERE active = '1' |
Dovecot を起動します。
1 2 3 | # systemctl start dovecot # systemctl enable dovecot Created symlink /etc/systemd/system/multi-user.target.wants/dovecot.service → /usr/lib/systemd/system/dovecot.service. |
SSL 対応
ウェブサーバー構築の際に取得した SSL 証明書を再利用します。
Let's Encrypt のワイルドカード証明書を取得した場合は、下記のように設定します。
Postfix
まず main.cf を編集します。
smtpd_tls_~ は送信時に対して、smtp_tls_~は受信時に対する設定となります。
1 2 3 4 5 6 7 8 9 10 11 12 13 14 15 16 17 18 19 20 21 22 23 24 25 26 27 28 29 30 31 32 33 34 35 36 37 38 39 40 41 42 43 44 45 46 47 48 49 50 51 52 53 54 55 | # TLS CONFIGURATION # tls_high_cipherlist = kEECDH:+kEECDH+SHA:kEDH:+kEDH+SHA:+kEDH+CAMELLIA:kECDH:+kECDH+SHA:kRSA:+kRSA+SHA:+kRSA+CAMELLIA:!aNULL:!eNULL:!SSLv2:!RC4:!MD5:!DES:!EXP:!SEED:!IDEA:!3DES # Basic Postfix TLS configuration by default with self-signed certificate # for inbound SMTP and also opportunistic TLS for outbound SMTP. # The full pathname of a file with the Postfix SMTP server RSA certificate # in PEM format. Intermediate certificates should be included in general, # the server certificate first, then the issuing CA(s) (bottom-up order). # #smtpd_tls_cert_file = /etc/pki/tls/certs/postfix.pem smtpd_tls_cert_file = /etc/letsencrypt/live/ドメイン名/fullchain.pem # The full pathname of a file with the Postfix SMTP server RSA private key # in PEM format. The private key must be accessible without a pass-phrase, # i.e. it must not be encrypted. # #smtpd_tls_key_file = /etc/pki/tls/private/postfix.key smtpd_tls_key_file = /etc/letsencrypt/live/ドメイン名/privkey.pem # Announce STARTTLS support to remote SMTP clients, but do not require that # clients use TLS encryption (opportunistic TLS inbound). # smtpd_tls_security_level = may # 送信時の暗号設定 smtpd_use_tls = yes smtpd_tls_ciphers = high smtpd_tls_protocols = !SSLv2, !SSLv3, !TLSv1, !TLSv1.1 smtpd_tls_mandatory_ciphers = high smtpd_tls_mandatory_protocols = !SSLv2, !SSLv3, !TLSv1, !TLSv1.1 smtpd_tls_session_cache_database = btree:/var/lib/postfix/smtpd_scache # Directory with PEM format Certification Authority certificates that the # Postfix SMTP client uses to verify a remote SMTP server certificate. # smtp_tls_CApath = /etc/pki/tls/certs # The full pathname of a file containing CA certificates of root CAs # trusted to sign either remote SMTP server certificates or intermediate CA # certificates. # smtp_tls_CAfile = /etc/pki/tls/certs/ca-bundle.crt # Use TLS if this is supported by the remote SMTP server, otherwise use # plaintext (opportunistic TLS outbound). # smtp_tls_security_level = may # 受信時の暗号設定 smtp_tls_ciphers = high smtp_tls_protocols = !SSLv2, !SSLv3, !TLSv1, !TLSv1.1 smtp_tls_mandatory_protocols = !SSLv2, !SSLv3, !TLSv1, !TLSv1.1 smtp_tls_loglevel = 1 |
次に master.cf の smtps の項目をコメント解除します。
1 2 3 4 5 6 7 8 9 10 11 | smtps inet n - n - - smtpd # -o syslog_name=postfix/smtps -o smtpd_tls_wrappermode=yes -o smtpd_sasl_auth_enable=yes # -o smtpd_reject_unlisted_recipient=no # -o smtpd_client_restrictions=$mua_client_restrictions # -o smtpd_helo_restrictions=$mua_helo_restrictions # -o smtpd_sender_restrictions=$mua_sender_restrictions # -o smtpd_recipient_restrictions= # -o smtpd_relay_restrictions=permit_sasl_authenticated,reject # -o milter_macro_daemon_name=ORIGINATING |
設定したら、Postfix を再起動します。
1 | # systemctl restart postfix |
Dovecot
Dovecot は 10-ssl.conf で証明書の場所を指定します。
1 2 3 4 5 | ssl_cert = </etc/pki/dovecot/certs/dovecot.pem ssl_key = </etc/pki/dovecot/private/dovecot.pem ↓ ssl_cert = </etc/letsencrypt/live/ドメイン名/fullchain.pem ssl_key = </etc/letsencrypt/live/ドメイン名/privkey.pem |
設定したら、Dovecot を再起動します。
1 | # systemctl restart dovecot |
Quota(容量制限)の設定
ユーザーごとにメールボックスの容量を制限したい場合は、Quota の設定を追加します。
Quota の方法としては、過去には Postfix に VDA パッチを当てたり、データベースのディクショナリ(dict)形式があったりしましたが、Dovecot 2.2.19 以降では count 形式が推奨されているようです。
Dovecot の設定
Dovecot の設定に Quota の設定を追加します。
1 2 3 4 5 6 7 8 9 10 11 12 13 14 15 16 17 18 19 20 21 22 23 24 25 26 | mail_plugins = $mail_plugins quota protocol imap { mail_plugins = $mail_plugins imap_quota } # Quota の設定 service quota-status { executable = quota-status -p postfix inet_listener { port = 12340 } client_limit = 1 } plugin { quota_status_success = DUNNO quota_status_nouser = DUNNO quota_status_overquota = "552 5.2.2 Mailbox is full" # 容量超過猶予 quota_grace = 10%% } plugin { quota = count:User quota quota_max_mail_size = 100M quota_vsizes = yes } |
Dovecot の SQL 接続設定ファイル(dovecot-sql.conf.ext)を修正して、Quota の値を取得するようにします。
1 2 3 | user_query = SELECT CONCAT('/home/vmail/', maildir) AS home, 10000 AS uid, 10000 AS gid FROM mailbox WHERE username = '%u' AND active = '1' ↓ user_query = SELECT CONCAT('/home/vmail/', maildir) AS home, 10000 AS uid, 10000 AS gid, CONCAT('*:bytes=', quota) AS quota_rule FROM mailbox WHERE username = '%u' AND active = '1' |
設定を反映するために Dovecot を再起動します。
1 | # systemctl restart dovecot |
Postfix の設定
Postfix に設定を追加し、Dovecot と連携させるように設定を変更します。
main.cf の smtpd_recipient_restrictions に check_policy_service を追加することで、メール送信前に Dovecot に容量を確認するようになります。
1 2 3 4 5 6 7 8 9 10 11 12 | # RCPT TO コマンド時の制限設定 smtpd_recipient_restrictions = # アクセスしてきているクライアントのIPアドレスが$mynetworksにマッチする場合許可 permit_mynetworks # SASL 認証に成功した場合のメール送信を許可 permit_sasl_authenticated # このサーバで配送終了とならないドメイン宛メール送信要求を拒否(不正中継対応) reject_unauth_destination # Dovecot に容量制限を確認する check_policy_service inet:127.0.0.1:12340 # このサーバで配送終了となるドメイン宛メール送信を許可 permit_auth_destination |
check_policy_service は必ず reject_unauth_destination の「後に」指定してください。そうしないとシステムがオープンリレーになってしまいます。
Postfix SMTP アクセスポリシー委譲 (postfix-jp.info)
設定したら Postfix を再起動しておきます。
1 | # systemctl restart postfix |
PostfixAdmin の設定
最後に PostfixAdmin の設定ファイルを編集し、Quota を使用するように変更します。
1 | $CONF['quota'] = 'YES'; |
メール振り分けの設定
Sieve の設定
ローカルメール配信エージェントである LMTP(Local Mail Transfer Protocol)と、LDA(Local Delivery Agent)に Sieve のプラグインを適用していきます。
/etc/dovecot/local.conf で lmtp と lda のプラグインに sieve を追記します。
1 2 3 4 5 6 | protocol lmtp { mail_plugins = $mail_plugins sieve } protocol lda { mail_plugins = $mail_plugins sieve } |
Dovecot を再起動して設定を反映します。
Procmail の設定
普段使いのメール振り分けは Sieve で事足りるのですが、より細かい条件で振り分けが必要な場合は Procmail に頼る必要もあると思います。
最近もメールアドレスを跨いだ振り分けルールを設定して、バックアップメールを集約する要件があったので Procmail を併用する方法も覚書として記述しておきます。
まずは Procmail をインストールします。
1 2 3 4 5 6 7 8 9 10 11 12 13 14 15 | # dnf install procmail 依存関係が解決しました。 ============================================================================================================================================================= パッケージ アーキテクチャー バージョン リポジトリー サイズ ============================================================================================================================================================= インストール: procmail x86_64 3.22-56.el9 rhel-9-for-x86_64-appstream-rpms 188 k トランザクションの概要 ============================================================================================================================================================= インストール 1 パッケージ ダウンロードサイズの合計: 188 k インストール後のサイズ: 367 k これでよろしいですか? [y/N]: y |
main.cf で transport_maps を読み込むように変更します。
1 2 3 | virtual_transport = virtual transport_maps = hash:/etc/postfix/transport procmail_destination_recipient_limit = 1 |
transport ファイルに Procmail を使いたいメールアドレス(またはドメイン)を列挙し、procmail: を指定します。
Sieve で振り分けるメールアドレス(またはドメイン)には dovecot: を指定します。
記述が上から順番に評価され、ヒットした条件でメールが配送されるので、個別のメールアドレスは上部、それ以外のドメイン全体の条件は下部に記述すると良いでしょう。
1 2 3 4 5 6 7 8 9 10 | john@example.com procmail: smith@example.net procmail: ・ ・ ・ example.com dovecot: example.net dovecot: ・ ・ ・ |
設定ファイルを postmap コマンドで変換します。
1 | # postmap /etc/postfix/transport |
master.cf の最終行に Procmail の設定を追加します。
1 2 3 | # Procmail procmail unix - n n - - pipe flags=R user=vmail argv=/usr/bin/procmail -t -m USER=${user} DOMAIN=${nexthop} /etc/procmailrc |
/etc/procmailrc を作成して、メールユーザーごとの .procmailrc を読み込むように設定します。
1 2 3 4 5 6 7 8 9 | SHELL=/bin/bash PATH=/usr/bin DEFAULT=/home/vmail/$DOMAIN/$USER LOCKFILE=/home/vmail/$DOMAIN/$USER/procmail.lock # User .procmailrc :0 * ? test -e "$DEFAULT/.procmailrc" | /usr/bin/procmail -t -m USER=$USER DOMAIN=$DOMAIN $DEFAULT/.procmailrc |
Procmail を設定するユーザーのディレクトリに .procmailrc を作成して、振り分けルールを記述します。
1 2 3 4 5 6 7 8 9 | SHELL=/bin/bash PATH=/usr/bin MAILDIR=/home/vmail/$DOMAIN/$USER DEFAULT=$MAILDIR/ LOCKFILE=$MAILDIR/procmail.lock LOGFILE=$MAILDIR/procmail.log ・ ・ ・ |
Postfix を再起動します。
1 | # systemctl restart postfix |
ドメインとメールアドレスの作成
先ほど設定した PostfixAdmin にログインし、メールアドレスを作成します。
- PostfixAdmin(https://ドメイン名/postfixadmin/)にログインする
- ドメイン一覧から新しいドメインを作成します
- 作成したドメインの画面を開き、メールアドレスを追加します。
Web メール(SnappyMail)の設定
実際に MUA(電子メールクライアント)から接続して、メールの送受信ができるか確認しておきましょう。
Outlook や Thunderbird が使える環境の方はそちらに設定を入れても良いですが、今回は Web メールで行います。
Rainloop を導入しようと思っていましたが、2022 年で更新が途絶えてしまっているため、後継の SnappyMail を代わりに使ってみます。

1 2 3 4 5 6 7 8 9 10 11 | # mkdir snappymail # cd snappymail/ # wget https://snappymail.eu/repository/latest.tar.gz # tar -zxvf latest.tar.gz # rm -f latest.tar.gz # mv _include.php include.php # cd # mv snappymail/ /usr/share/ # find /usr/share/snappymail/ -type d -exec chmod 755 {} \; # find /usr/share/snappymail/ -type f -exec chmod 644 {} \; # chown nobody. -R /usr/share/snappymail/ |
OpenLiteSpeed の設定
OLS の管理画面にログインし、バーチャルホスト ⇒(バーチャルホスト名)⇒ コンテキストと辿り、SnappyMail の設定を追加します。
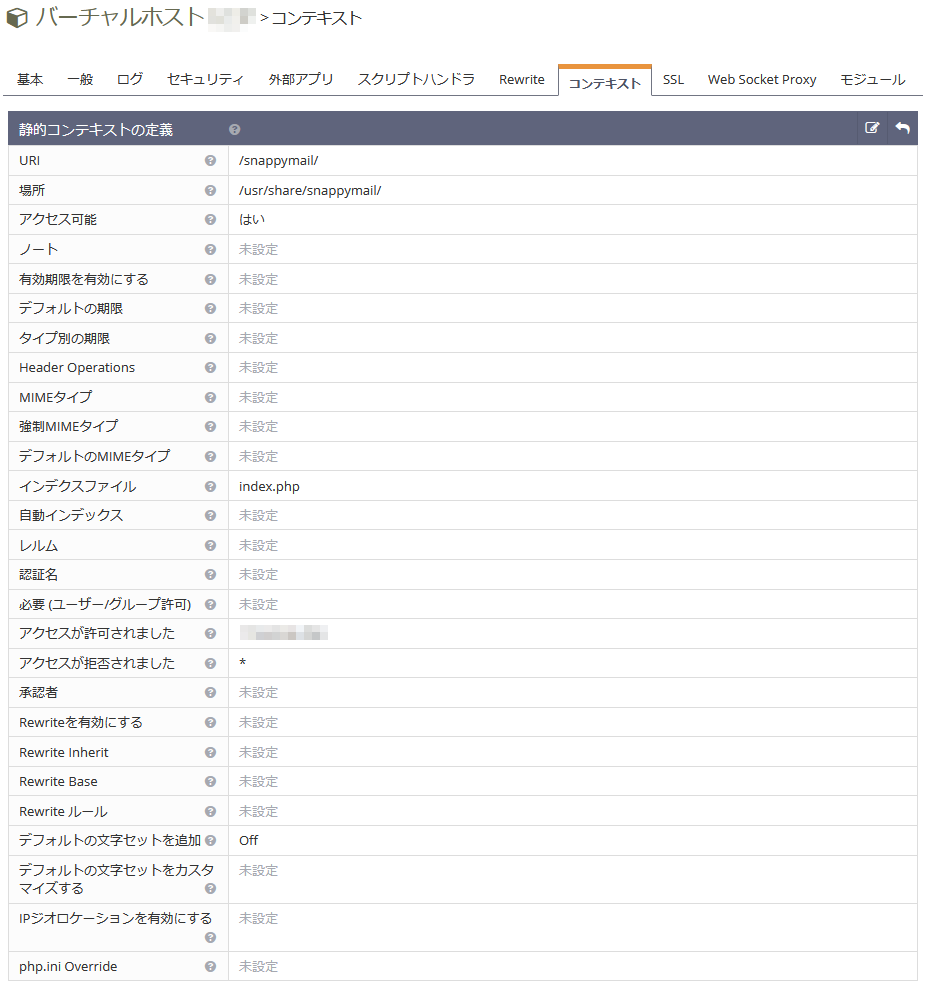
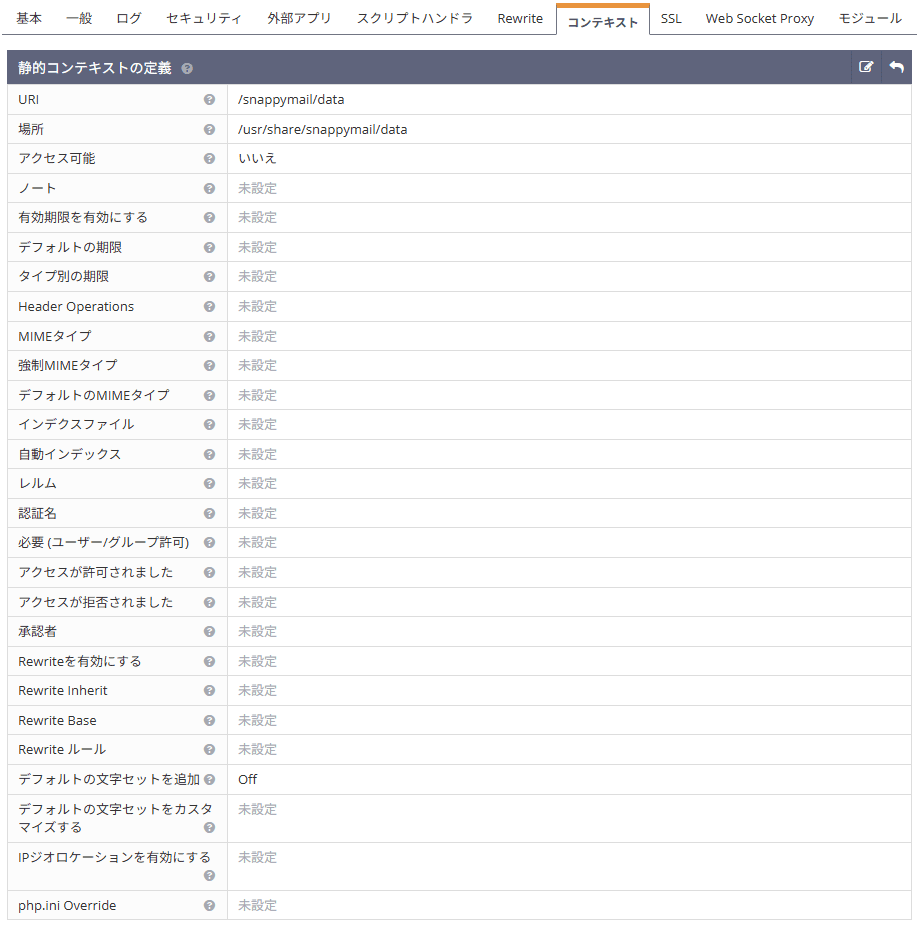
もう一つコンテキストを追加し、/snappymail/data ディレクトリへのアクセスをブロックします。
SnappyMail の初期設定
SnappyMail の管理画面(https://ドメイン名/snappymail/?admin)にアクセスします。
- ユーザー名:admin
- パスワード:/usr/share/snappymail/data/_data_/_default_/admin_password.txt を参照
- TOTP コード:(空欄)
最初に管理者パスワードの変更と、ドメインの設定を行います。その際 Sieve スクリプトを使用する設定で「テスト」が通るか確認しておきましょう。
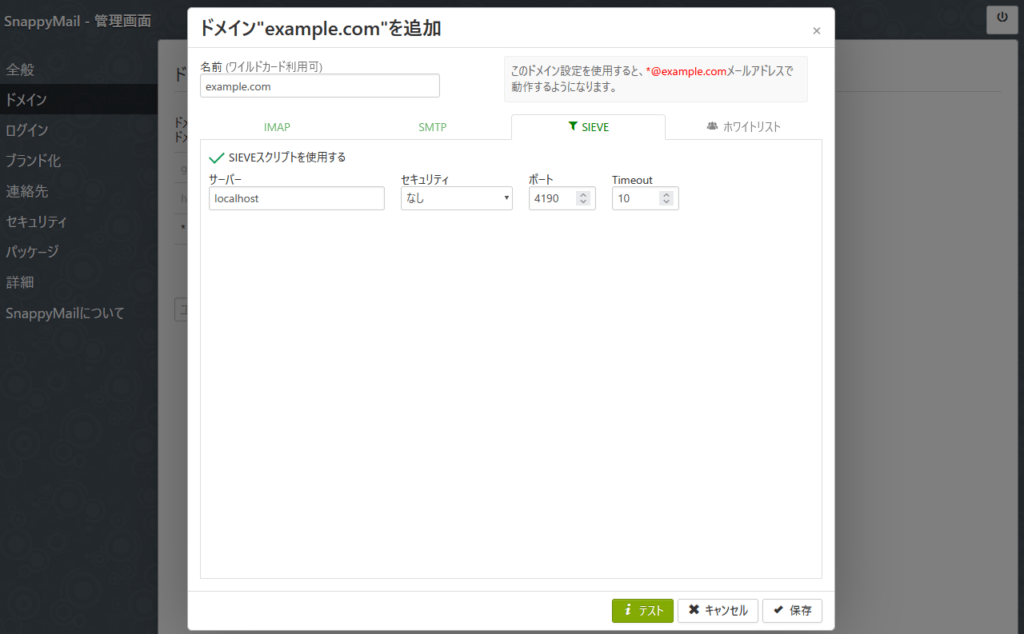
また、PHP optional extensions の項目でいくつか不足しているものがあります。OpenLiteSpeed 用の PHP8.2 で簡単に導入できるものだけ入れておくことにします。
1 2 3 | # dnf install lsphp82-apcu lsphp82-sodium lsphp82-intl lsphp82-tidy # dnf --enablerepo=remi install ImageMagick7 # dnf install lsphp82-imagick |
インストールができたら OpenLiteSpeed を再起動しておきます。
メールの送受信テスト
SnappyMail の管理画面ではなく、一般のログイン画面(https://ドメイン名/snappymail/)を表示します。
先ほど作成したメールアドレスとパスワードでログインし、メールの送受信ができるかどうかテストしておきましょう。
Sieve のルールを追加
SnappyMail にユーザーとしてログインした画面で、「設定」⇒「フィルター」と辿ると以下の画面になります。
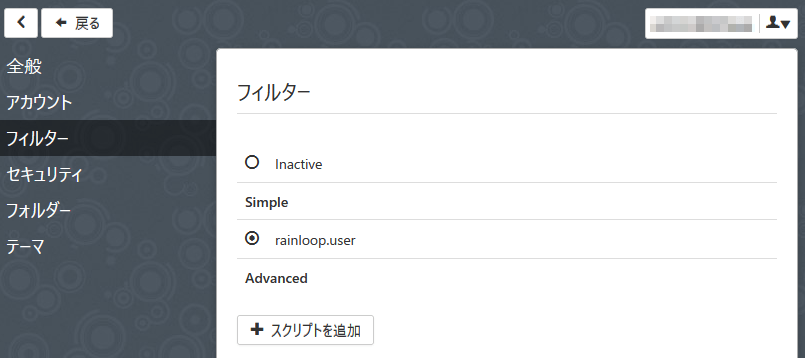
分かりづらいですが Simple の項目にある rainloop.user から Sieve のルールを編集できます。
クリックすると「スクリプトを編集:rainloop.user」の画面になりますので、「フィルターを追加」から振り分けルールを追加します。
ルールを追加したら必ず「保存」をして反映しましょう。
後編に続く
長くなってしまったので、一旦ここまで。
後編では DKIM や SPF の設定などを入れつつ RSpamd による迷惑メール対策やウイルスチェックを設定していきます。


コメント
自分もRHEL9でサーバを構築しようとしているので、参考にさせてもらっています。
一つ気になった点があるので連絡します。
main.cfに
smtpd_sasl_auth_enable = yes
と書くと、25番ポートでの認証が有効になるようです。
25番ポートはパスワードクラック行為がひどいので、無効にされるのが良いと思います。
smtpd_sasl_auth_enable の意味を間違って認識していました。
仰る通り 25 番ポートでの認証が有効になってしまっていたので、無効にしたほうが良いですね。
記事の方も訂正させていただきます。
ご指摘ありがとうございました!